
To me, photography is an art of observation. It’s about finding something interesting in an ordinary place … I’ve found it has little to do with the things you see and everything to do with the way you see them.
– Elliott Erwitt
Some things come easier to us because they blend with our nature. For me, it’s finding the smaller stories in a scene. I tend to notice and pay attention to details. I can easily find a four-leaf clover in a large patch or notice a tiny spider tucked in the folds of a flower. I’m also one of those who balance my checkbook to the penny – for over 44 years. Details resonate with me.
Smaller stories in photography range from slices of the bigger picture to macro and close-ups. Even if your leaning and love is the grand landscapes, the “slicing” comes from your choices of what parts to include in your frame and why. For this blog, the focus will be on the smaller “stories” that are found in the macro and close-up world. Again, I tend to “go small” more often than latch onto the expanded views. As to why the small world is my “Calgon,” I don’t really know. What I do know is that when I notice the details (a curl of a petal, rust textures or patterns on old cars, lines and curves on plants and flowers), I am drawn in. And, when I “dig in,” the rest of the world and time evaporate.
Very early in my photography journey I had an epiphany of sorts in a wildflower field that confirmed my love for the “smalls.” This prompted the purchase of my first macro lens. Before then, I had been using a set of close-up filters (+1, +2 and +4). In the field, with my film camera (and two lenses), I stacked them all and found myself … In the end, however we get there, what we “put in the box” is our own smaller story.

Wild Geranium with 28-300mm at f/5.6 on tripod
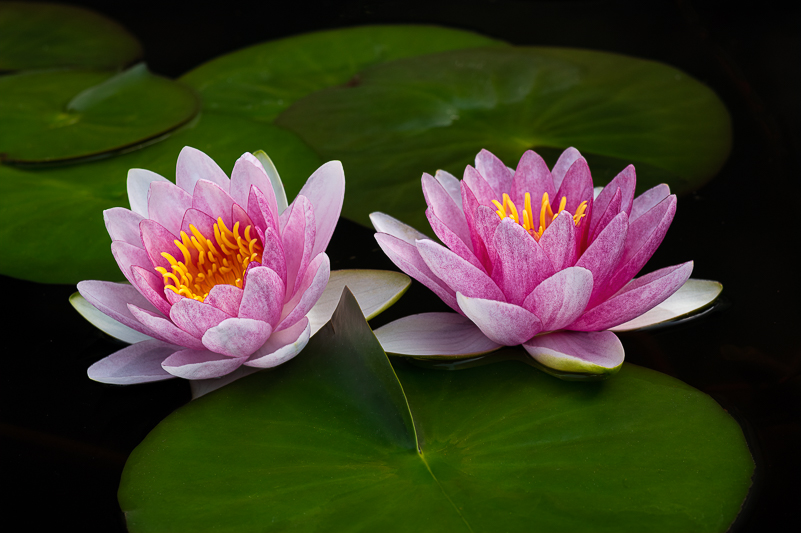
Water lilies with 70-180mm micro at f/16 on tripod
START WITH THE GEAR
Before I share the camera gear I use, you should know that I’ve accumulated much over the course of nearly 25 years. And, most of what I have I still use, though some more than others. Honestly, no one truly needs everything I own to create wonderful “small world” images.
My collection of equipment for macro and close-ups includes a Nikon Z6ii mirrorless body with adapter (allows me to use all my non-Z lenses). I have three macro lenses (90mm, 70-180mm and 200mm), at least six supplemental macro/close-up diopters (Nikon 6T, Canon 500D), extension tubes and a miscellaneous collection of close-up filters. I have a roller bag “plus” full of Lensbabies, optics and close-up filters that will get me close when I want, which is often. I also use my Nikon 28-300mm VR lens and the 500D (magnification approx. 1:3.2) combination to get close. This lens has a short minimum focusing distance (MFD) of 1.6 feet, which helps. Working distance is about 8.5” from front of lens. The 500D and 6T’s increase magnification, reduce working distance and can be used on any lens with the help of step-up rings (brand or type of lens does not matter). The reason for using any supplemental accessory noted above is to increase magnification of your subject in the frame and get you closer. Can you crop? Of course, you can, but I prefer to do as much as I can in the field.
So, what do YOU need to get closer to your smaller subjects? In a perfect world, having a macro lens would be great. However, if you have close-up diopters or extension tubes, you can get closer with any lens (my preference in the alternative is to use a zoom telephoto combination). Wide angle lenses can work and do allow close focusing, but your working distance shrinks, and lighting your subject becomes more challenging.

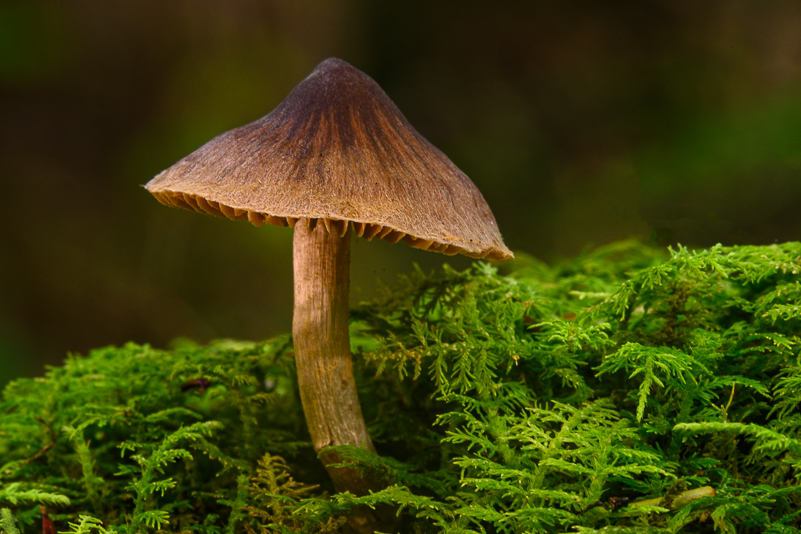
Mushroom in Forest Scene – 28-300mm at f/22 on tripod
Mushroom Star with 28-300mm & 500D at f/5.6 on tripod
Other Accessories for Macro/Close-up
You really need a sturdy tripod that has independent legs and a way for you to get low to the ground when you need to. Yes, I know, you probably have one and don’t like using it. Here’s the thing, none of us are statues. Not everyone “loves” or uses their tripod. Instead, increasing ISO is one of the common responses. It can work, and I do handhold when the situation is “good” for that or when the tripod acrobatics required is impossible for any given subject and composition. The disadvantage of handholding is that we miss out of the “refinement” opportunities that come with using a tripod. Almost never do we return to the same composition when we’re handholding. Also, using a tripod, along with shutter release cable or self-timer, gives us sharper images (unless our subject moves or is moved by the elements).
Diffusers and Reflectors – These are your friends and lighting assistants for various situations – bright, shaded and mottled light. The diffuser evens and softens the light on your subject. By varying placement, you can control levels of light (closer- more light filters through; further back, less light, more like soft shade, but even). The reflectors (gold or silver) allow you to bounce light back onto your subject or scene (gold/warm, silver/cool-neutral). In the field, I typically use a 22” 5-in-1 diffuser reflector set and a 12” reflector hooked to my belt loop or bag with a carabiner. In the larger pouch, I also add the diopters and either a small flashlight or light (Litra Torch), even if I’m using my macro lens. I find that very often I want to get even closer, and a small light source in addition to reflector is helpful. You can also shine your light through the diffuser for some additional filtration.
Filters – Circular Polarizer & Neutral Density – Almost always (except under really low light), I have a circular polarizer on my lenses. On rare occasions I do remove. (See “Polar-What?” blog for more on that.) Occasionally, but not often, I may use an ND filter if I need to tone the exposure down or accentuate movement of some kind, but rarely. A 3-stop ND filter can come in handy for this. It is usually a “just-in-case” accessory for my macro work, and it’s not standard practice for me to bring for most macro and close-up work.
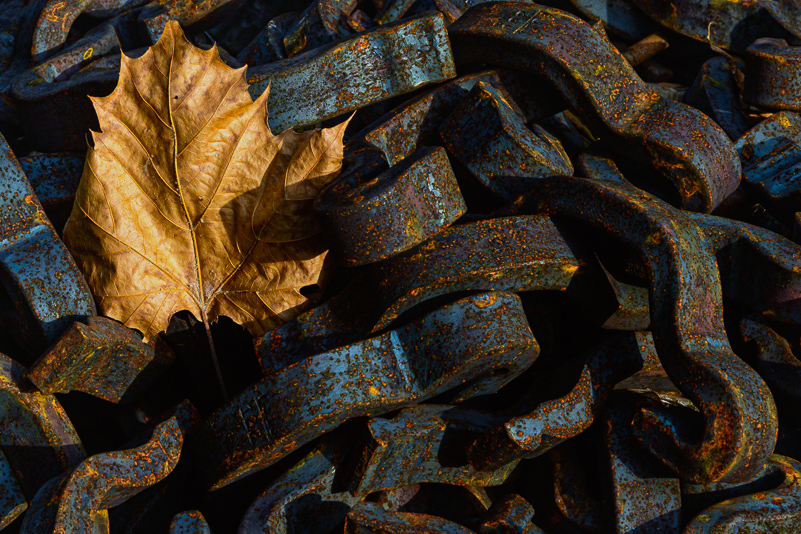
Fall leaf on metal with 24-105 at f/16 with diffuser on tripod
NOW, THE PROCESS – THE HOW AND WHY
So, now that the gear talk is behind us, let’s explore a few concepts that have little or nothing to do with our gear. (You’ll get more insight in the image captions.)
Looking and Seeing – There’s a Difference
It may sound funny, but there IS a difference. We cannot find subjects If we don’t open our eyes and begin to “look.” The challenge becomes a matter of slowing down, opening not only our eyes, but our minds. We must put on our “noticers” to begin to “see” our subjects. The awesomeness of anything is not always obvious. I was reminded of that recently at Grandfather Mountain Nature Photography Weekend, where I was presenting and leading several field sessions in MacRae Meadows.
My first impression of the Meadows was, “Oh, no. What can I find here to shoot for my groups?!” My eyes were open, but my mind was not. It was only partly cracked to see all the options. I went back two more times, each visit with a more open mind. On that third visit I was fully present and open and discovered a world of possibilities – from a wonderful bed of ferns, fallen leaves and acorns to what turned out to be a mushroom wonderland. What changed? Not the Meadows … but me. My eyes and mind were finally open to anything. My attitude had softened – going from anxious to relaxed and even excited. Now, I could SEE more than the meadows minus the wildflowers I was hoping for. So can you.
How? Practice . . . and Focus. Try this: Wherever you are, pick a spot. Have a seat. No camera, just you. Look around and begin to notice what surrounds you on a smaller scale (grass, leaves, flowers, bugs, whatever). Then, look closer at your surroundings. Pay attention to colors, patterns, shapes, lines and textures. Look beyond what the things in front of you are called. That’s just one way to “look and see” before you plop yourself and your gear down to start shooting.
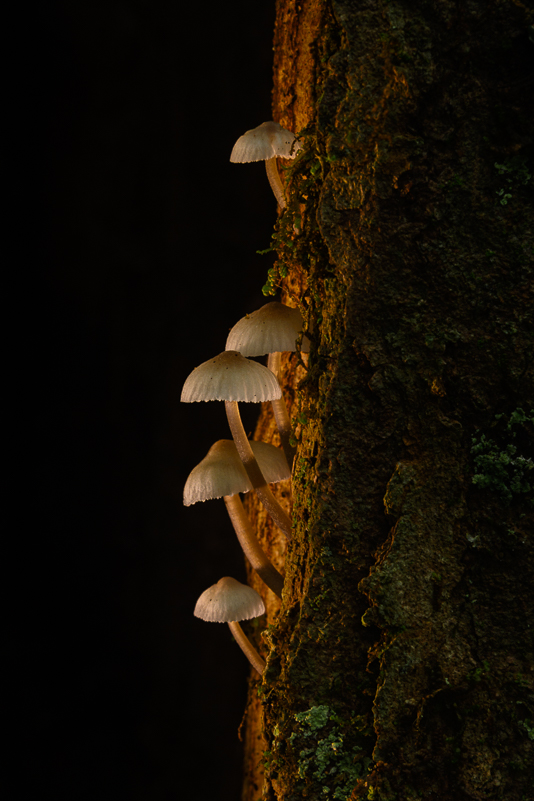
Tiny mushroom family with 28-300mm and 500D at f/16, underexposed at -2.3 EV on tripod. Lit from below with flashlight snoot. The final frame in series of 24 to achieve the desired effect for lighting and depth of field.
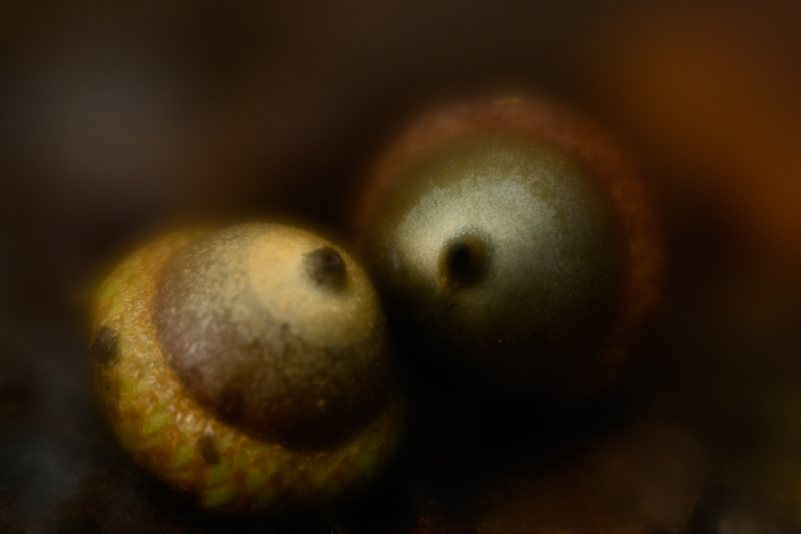
Acorn pair with Lensbaby Velvet 56 and 6T diopter, handheld at ground level. Underexposed by -1.3 EV and wide aperture (f/2) for soft effect.
CHOOSING YOUR SUBJECTS
How do you choose your subjects? Hopefully, you consider what the actual subject is first . . . and then articulate what about that thing made you stop and take notice. Hopefully, you have what you need gear-wise to make an image that speaks to why you stopped. Hopefully, you consider what you want in the image before you start shooting “willy nilly” with hopes that you bring home something good (like the bacon).
When I go out to shoot – whether inside at home, out in the back patio, or anyplace in the field – I have a general idea of what I might want to photograph in the small world, much of the time, but not always. Sometimes, I go out with my macro lens or Lensbaby and accessories to see what I can find. My intention is to find a subject that is interesting to me, something that excites me. And, if I’m very lucky, I find something that I can get lost in . . . but let’s get practical.
I look for subjects that spark my interest, that have some unique features, and that hold my attention long enough for me to say, “Why this one … and not that one?” There’s always (and should be) a reason for your choices. I love flowers when they are fresh and new, but I also love the wabi-sabi, dried up, curled and crinkled ones as well. Does my subject have character, distinctive features I can accent? Can I get in close? If so, just how close can I get? And, when I’m faced with multiple options, I work to pare down to one or two of any subject that give me the best potential or a solid image. Then, I state out loud why I made the particular choice of subject. Yes, I do talk to myself in the field. And, it continues as I ponder what I need to get the image I want.
One thing to pay attention to when choosing macro subject is the background. You’ve probably heard that often the background Is as important and sometimes even more than the subject. Is the background super busy? If so, does it work for what you’re trying to do? If not, is it something you can control with aperture choice to soften It up? Are there dark or light patches that are distracting? Can you change your position to get them out? Do the background colors compliment your subject? Again, can you reposition for a more pleasing background? If not, perhaps a different subject choice is in order. What do you want in the image? Is the background helping or hurting your chances for success?

Blue bells with 90mm macro at f/3.8 on tripod for shallow depth of field and soft background
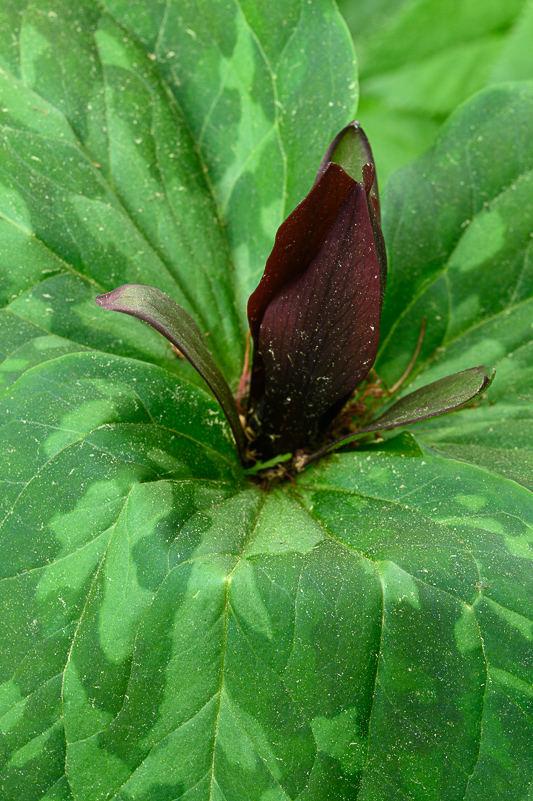
Trillium with 90mm macro at f/16 on tripod
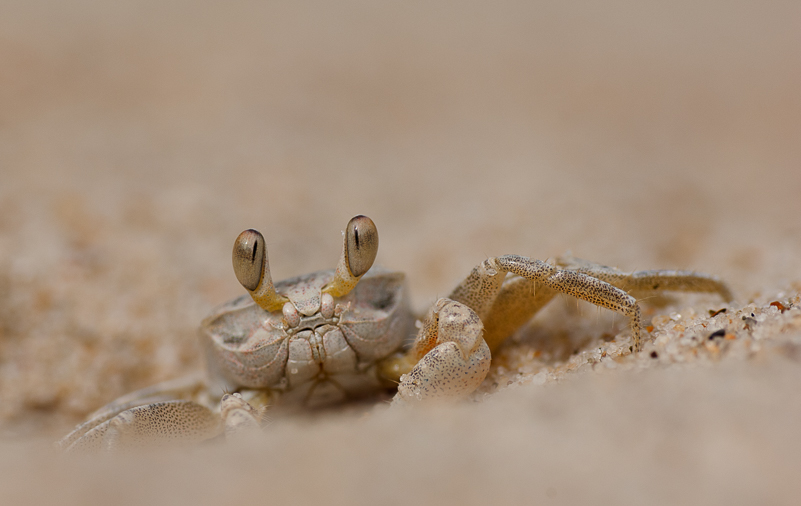
Ghost crab with 70-180mm micro at f/7.1, handheld at ground level for eye contact and shallow depth of field
THOUGHTS BEFORE SHOOTING
Instead of jumping right into shooting any subject, I work at giving thought to where I want to go visually. Am I documenting or interpreting? How much of the subject do I want in the frame? And, so on. The one thing I don’t do is approach a subject with my camera and lens already attached to the tripod with legs fully extended. I may need to change my lens, and often, I’ll need to lower all the sections of the legs. So, I’ll carry the tripod separate from the camera and stuff a few lenses and accessories in my bag.
Again, I’m pondering. What Is the subject? If more than one of a group, which one is the “star” and which are the supporting characters? I keep asking myself questions. Why this one? What made me stop? Where do I need to stand, kneel or lie down to get that “star” in the frame as I envision? What lens and accessories are best to start with to tell that story? Once I figure out my position, placement and perspective, I take some practice shots without the tripod to further refine my starting point. Then, I bring in the tripod or other support and lighting tools to begin.
Other choices we need to make (sometimes challenging) include what aperture we need to use for appropriate depth of field and where to place the focus. In addition, do we use auto-focus or manual? It depends.
Selective focus and shallow depth of field is a part of my shooting style. However, some subjects require a small aperture to record as much detail as possible. Getting parallel to your subject is one way to maximize DOF, but it’s not always the best angle for the composition you’re after. Focus Stacking is a technique for deep depth of field that can be helpful in macro to record all the detail that sometimes even f/32 won’t capture. It involves taking many images (on tripod) at different focus points. It takes practice and a thoughtful approach to achieve the results you’re after. Even if your camera will do the work for you in terms of taking the images, you’ve still got to learn the steps for post-processing. Having a vision and working out the steps in the field and in post are important. If you want to use shallow DOF, then where you place the edge or point of focus matters. You’ve got to “do the dance” and work the image in a logical way to get your composition and exposure in a good place first. Then, place the focus in your first-choice position (the one that makes the most sense to you). Ask yourself what areas, if not sharply focused, would bother you. There’s your starting point.
And, another consideration is whether to use auto-focus or manual focus for your macro and close-up images. It depends. My eyes are not as good as they used to be, so if autofocus works, I use it. That said, I will never let an autofocus point steer or change my composition. So, very often, I will use autofocus to get me in the ballpark and then switch to manual focus to refine according to my vision for the subject.
If you’re not sure which aperture is best, take a series of images and vary the aperture for each composition. Don’t start the next series with a different point of focus or perspective until you finish with the first. Work each perspective in the field until you have taken enough to give yourself options in post. In other words, work your subjects – intentionally. Wring out all the possibilities. Believe me, I see far too many attempts at macro image making that fall short and land heavily in the “hurry up and shoot” zone that might include only a few images, handheld, out of focus or poorly composed. If you leave before you get it “right,” you’ve wasted time. If you’re in a hurry, you cannot slow down, focus and execute your vision, unless you’re a magician.
Often, I will stay with a subject for quite a while, sometimes an hour or more. It’s not that I’m advocating this for you, but you must give your subjects the time and attention it takes to make all the pieces come together. Make sure your final frames make you smile . . . And, just for good measure, take a look at your series. Where did you start? What adjustments did you make to keep refining? And where did you land with the images you’re happy with? Those extra frames and extended time spent before you felt successful represent you working it all out. (Many of my series with macro subjects are over 20 frames and some even in the 64-frame range.) Take the time.
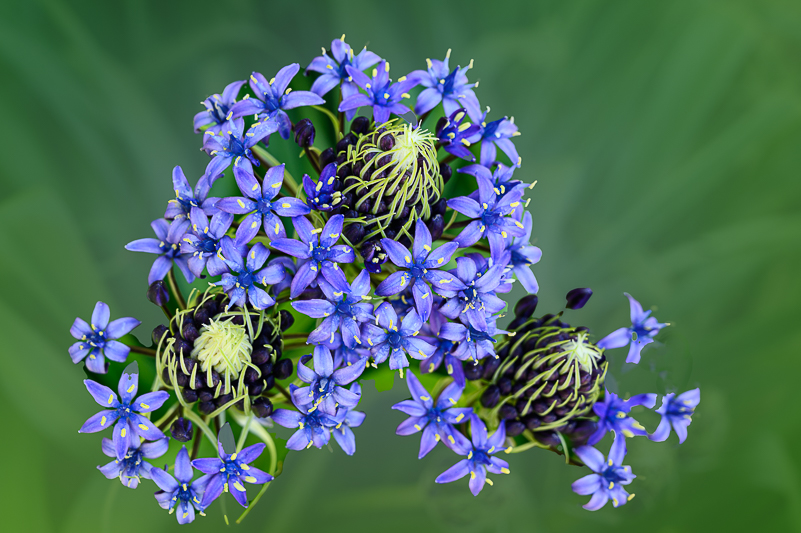
Portuguese Squill with 24-70mm at f/6.3 with overhead perspective
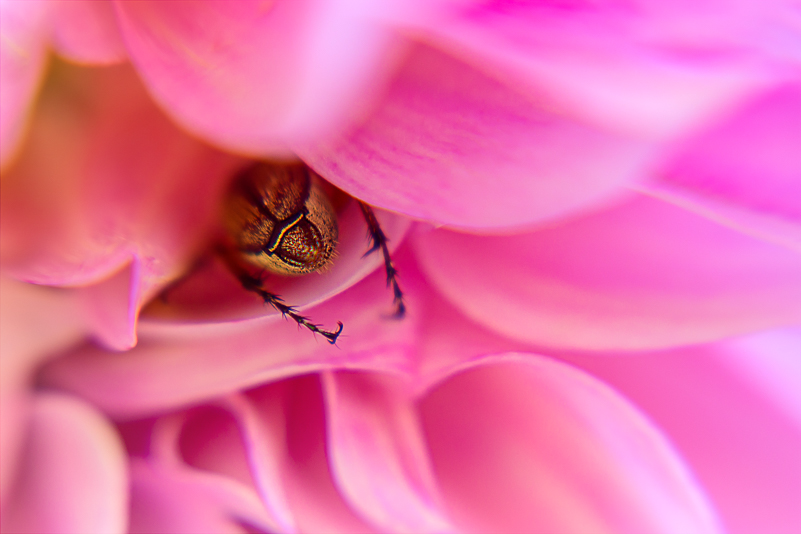
Japanese beetle in dahlia with Lensbaby Sweet 50 and close-up filters at wider aperture, handheld
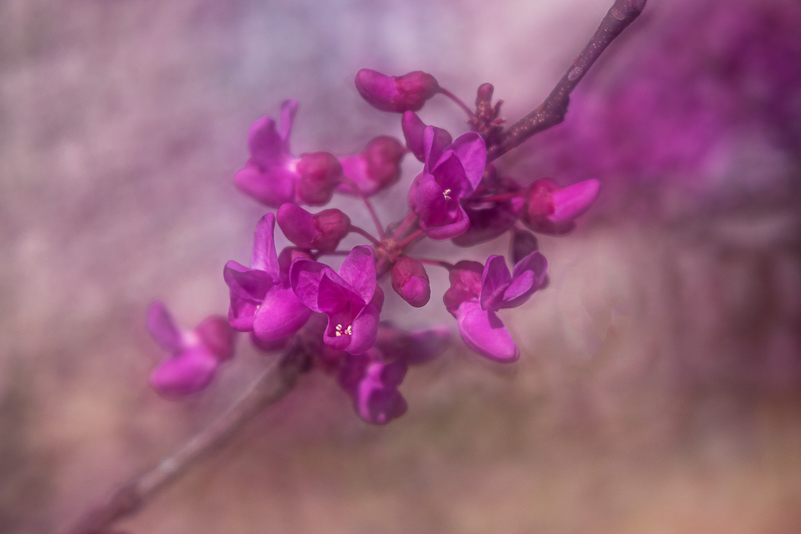
Spring Redbuds with Lensbaby Soft Focus II, handheld at wide aperture with texture disc in place
TAKE AND GIVE YOUR TIME FOR THE SMALL STORIES
No matter what your “small story” subject, get to know it. Spend a few minutes exploring. Asking and answering questions that lead you to a starting point have value. Answer them. What made me stop? What’s the best lens, aperture, and so on, for me to be able to achieve a result that doesn’t need explaining. If you cannot get as close as you would like, do the best you can in the field first. Then, explore crop option in post. Even if your small story is peeling paint, which section of that is your favorite, your first pick? Work it! Don’t bail after a few frames. I promise you, there’s a party waiting for you to show up. So, do that.
And, remember, there are a lot of options to consider with no single “right” answer. The only consistently accurate response to the question of where to start and how to get to your final image is, “It depends.” It depends on your vision. It depends on what gear you have with you, what the light is, whether you have the knowledge, skills and patience to make the image happen. It depends on how well you know your camera, how well and how comfortable you are with post-processing. It depends on your individual view of any subject. Do you “love” it (like I love my flowers), or is it simply an interesting subject? Keep in mind, we don’t have to be “perfect.” We are always learning and growing in a wide range of areas.
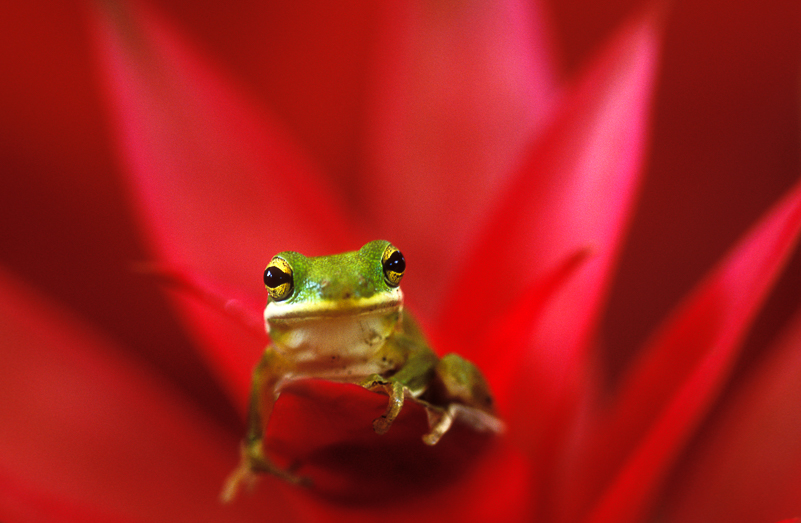
Tree Frog in Red with 70-180mm micro (slide film). Corner filled by red t-shirt in field
Cactus in Pot with 90mm macro at f/16 on tripod for pattern details
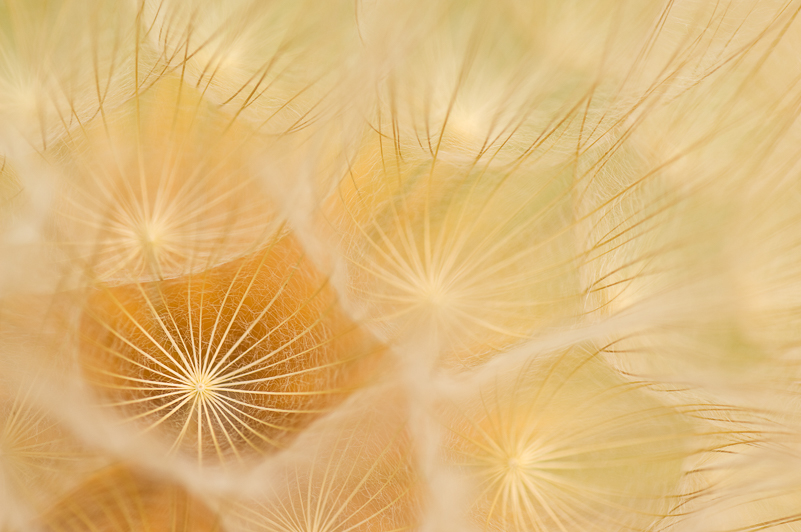
Goat’s Beard (salsify) with 70-180mm micro at f/6.3 on tripod and manual focus
PRACTICE, LEARN AND GROW
Practicing techniques when it doesn’t matter helps us develop muscle memory for when it does. It helps us get into a flow more easily when we’re not battling our camera and buttons. It helps us when we become comfortable with choosing and setting exposures and working compositions (which always matters). If you’re new to macro and close-up photography, welcome to the world of smalls – they’re everywhere. There is always something new to learn. Start somewhere, start simple, and practice, play and practice. Don’t be afraid of making mistakes – we all do. Just keep at it. Find subjects you like and work them. Be encouraged and get going.
If you’re “old hat” (like me), you likely have your ways that work for you. That said, keep an open mind. Learn from everyone, and share what you know. We’re in this world of smalls together – whether tack sharp, documentary, selective focus, artistic or abstract. There is never nothing to learn.
There are smaller stories in macro and close-up, for sure. But smaller stories are everywhere, even in the grand scenes. Start big and keep moving inward if you want, but remember that possibilities are endless. You’ll only “see” them if you keep an open mind, slow your pace and put on your noticers.
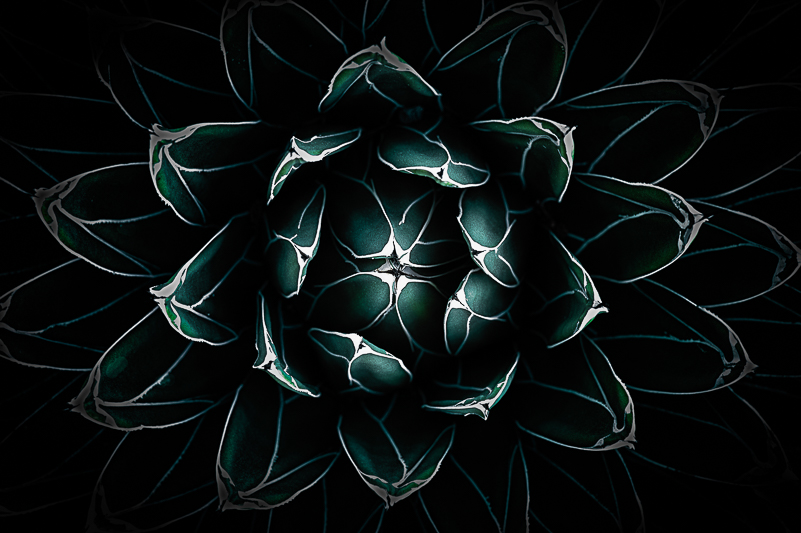
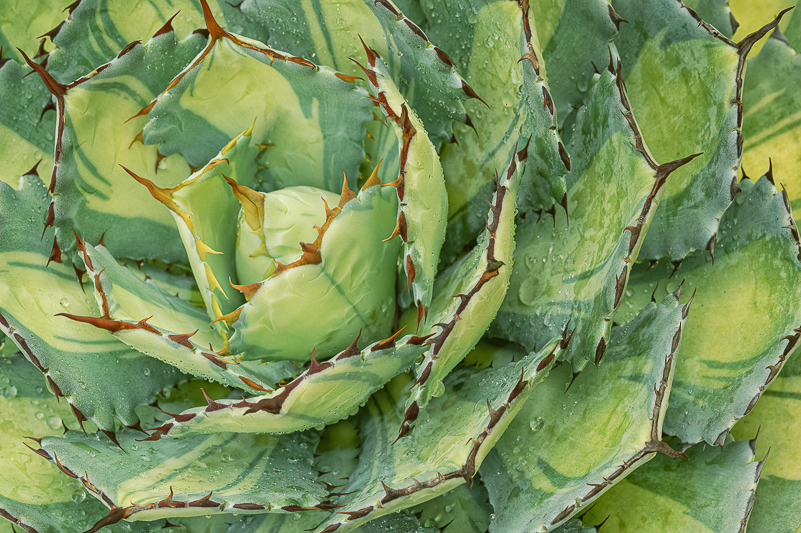
Agave with 24-70mm at f/8 on tripod. Final image is blend of color and black/white versions.
“The two most engaging powers of a photograph are to make new things familiar and familiar things new.”
by William Thackeray
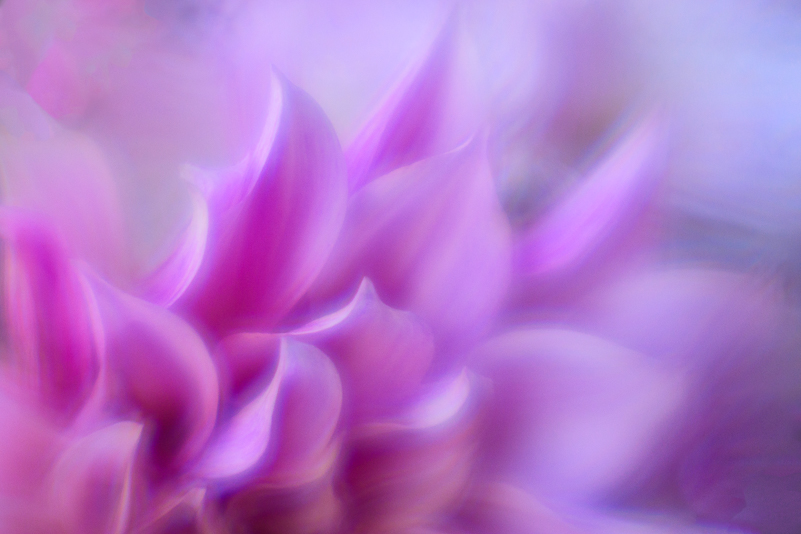
Dahlia petals with Lensbaby Creative Bokeh with macro filters and handheld

Rose Curls with 70-180mm micro at f/5.6 on tripod for selective focus

Iris Leaf abstract with Lensbaby Soft Focus II handheld at wide aperture and defocused
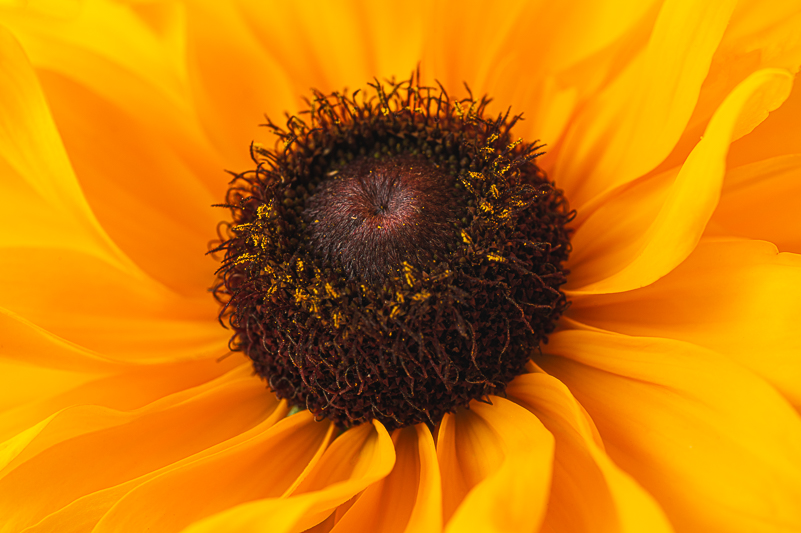
Rudbeckia with 70-180mm micro with diopter at f/16 on tripod

Century Plant impressions with 200mm micro at f/22 on tripod
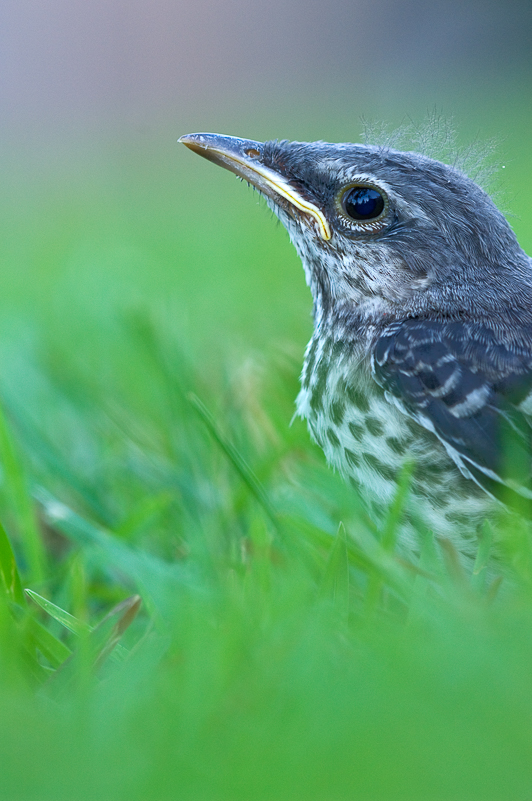
Baby mockingbird with 200mm micro at f/6.3 for selective focus, handheld at ground level


