May the blessing of Light be on you, light without and light within . . .
–Irish Blessing
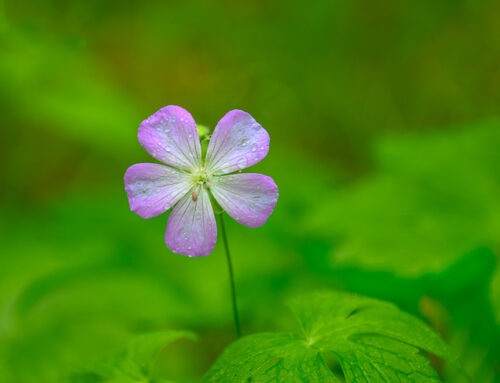
It has been raining for months where I live. Other parts of the country have had snow, snow and more snow. It’s easy to complain and yearn for sunshine and spring, but sunshine and spring will come in their own time. Meanwhile, there are things we can do, learn and photograph in the cold of winter, during the rainy days that come all year long. And so, I share … the lightbox.
Our cameras (all cameras) are boxes that capture light – Receivers. A lightbox is a Giver of light – one that we can use in many different ways. Take flowers, for example. Flowers are one of my favorite subjects, and they are absolutely wonderful for high-key images that sing on their own. They also lend themselves to further explorations with textures, line, shape and design and creative post processing.
I’ve made it a goal to learn new ways to express myself as a visual artist with a camera. The lightbox technique has been on my list and provides another option for photography on less-than-ideal weather days – when the muse is calling, and when I ache to follow that call.
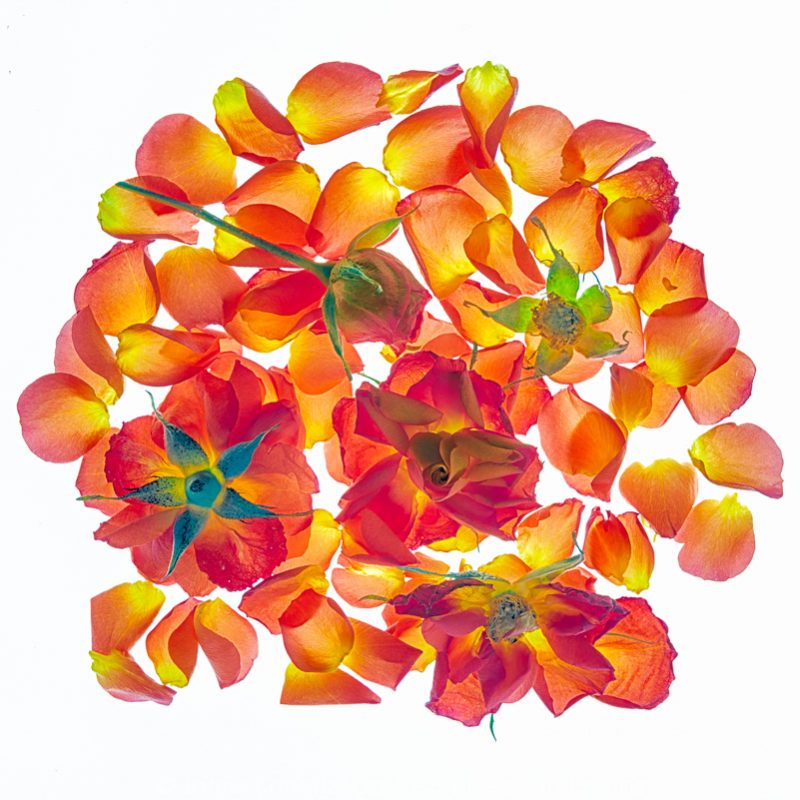
This arrangement of roses was from my first attempt at lightbox photography. Arranging the petals and deciding what portions of the roses would be included was an interesting process. Tip: When dealing with petals and parts, gently using tweezers is easier than moving them with your fingers.
While other subjects can be used in lightbox photography, I’m going to start with the flowers. If someone told me I could only photograph one subject for the rest of my life, I would choose flowers. They are everywhere and offer an endless supply of beauty, even in how they fade away. Inspired by the work of Harold Davis and his way of photographing flowers for transparency, I began this journey with my small “slide-sorting” lightbox that has been sitting on a shelf for the past 14 years, ever since I stopped shooting slides and transitioned to digital.
I quickly saw the limitations of such limited space to work with. Now, I have a thin LED light panel (17” x 24”) that so far seems to offer the right amount of “creative real estate” for me. We shall see. Even as I write this, I’m thinking of ways that I could make room for another even larger lightbox.
As I explore and learn, I see more things that play into successful sessions. As with all photography, composition matters – always. It makes a difference in the quality of your images when you think through how you hope your final image to look. The process is not a simple “plop and shoot.” Success includes Intention. Give some thought to what direction you want to go in. What is your vision? How will you arrange the blooms? How will you build your images? There’s nothing wrong with trying things that don’t work, but starting with an initial plan will lead you down a more fluid and creative path.
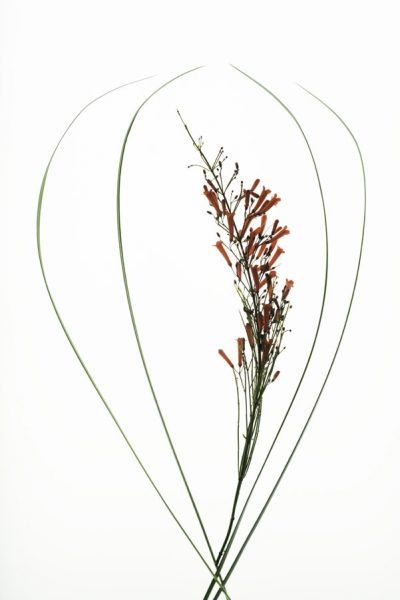
With this composition, I was thinking of simplicity, using the thin grasses to frame the orange flowers. You could also think of this as creating the foundation (or bones) for going further in the process of filling in the visual story.
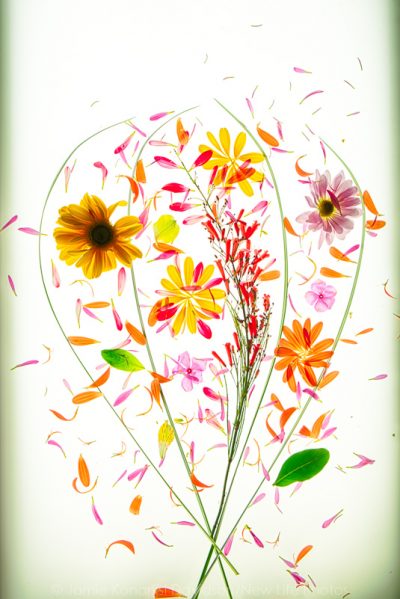
Here you see an expansion of the creative process with more flower added, petals floating in the frame, and taking the image further with post processing and adding texture and flavor with Topaz Studio’s Texture Effects.
So, how do you get started once you’ve found your missing lightbox or acquired a new one? First, find a place inside that works for you that gives you enough room to gather all the tools you need and where you can minimize ambient light so that the lightbox is the primary light source. Get your camera and lenses ready as well as your tripod and a shutter release (cable or remote). Macro lenses work best in my experience, but remember, I’m at the beginning of this journey. I’m sure I’ll find ways to make other lenses work in time if I need to. Cut or purchase your flowers or leaves or branches – whatever you’re going to photograph. It doesn’t hurt if you plan ahead and plant the flowers you’d love to photograph. Tulips and daffodils are just coming up in my garden now, but dahlias and other wildflowers will follow as the season progresses.
Check the white balance for your lightbox. Some are set to daylight WB, but yours may be different. Get a reading on your lightbox. Take an image with your meter set at “0” with the lightbox on and minimize the ambient light. Take the image into Photoshop, and check the Kelvin setting. Set your camera white balance to that match the lightbox setting. Just remember to reset your camera back to normal WB settings when you’re done with the session. Is it possible for you to change the white balance in post-processing? Yes, but why not set your white balance in-camera before you start. I would highly recommend that you shoot in “Raw” file format, If you shoot in JPG format, it is even more important to start with the correct white balance due to in-camera processing that you are not in charge of.
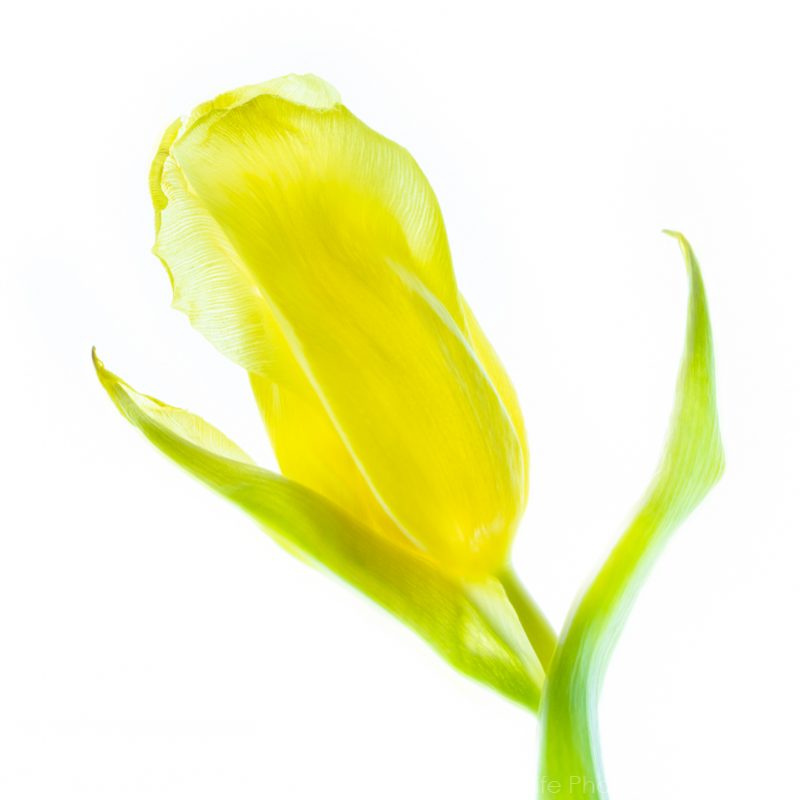
This is just one of the tulips in the “yellow tulips” session. It is the result of a bracketed series for capturing all the tones and manual HDR processing using layers and masking.
Choose your flowers. What flowers work best on a lightbox? Typically, you want to choose flowers that have some level of translucency in their petals. Tulips, roses, poppies work very well. There is also potential for other flowers from the garden such as hydrangeas, hibiscus, peonies or dahlias. Most any flower will work as long as you keep in mind the density of petals and structure of blooms. We’re not going to focus in a singular fashion on going “transparent,” but recognize the different qualities that each type of flower offers. Consider features such as color, structure and design, and think about how you might arrange and photograph them. Are you going to focus on only the flowers and parts? Or are you going to create a still life that includes flowers and other elements, such as bottles or vases? You are in charge. Just give consideration to whatever you’re working with and where you want to go with them.
Be Aware of the Position of the Camera. For many compositions, you would want the camera to be parallel to the lightbox and your subject for maximum depth of field (DOF). That may not always be possible or practical (or even safe, if you set up on a table and have to shoot down from a ladder or chair). Do the best you can. If you need or want more depth of field for your subject, consider focus-stacking in addition to bracketing for exposure. This means adding multiple images taken at different depths of focus for each bracketed exposure. You decide whether that is important for your image to achieve the intended result. Remember, even at f/22 there are flowers and other subjects that will not have everything in sharp focus. Think of orchids and how many slices of focus it would take to get one bloom in complete focus. It would take far more than a curved tulip petal laying relatively flat on the lightbox would require.
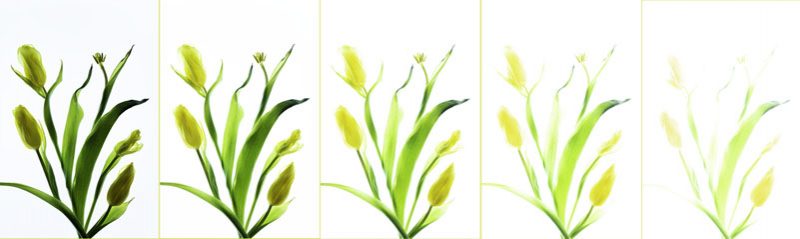
Here is a series of five bracketed images used to create the final image below. Every subject requires its own number of frames with a bracketed series to capture all the tones.
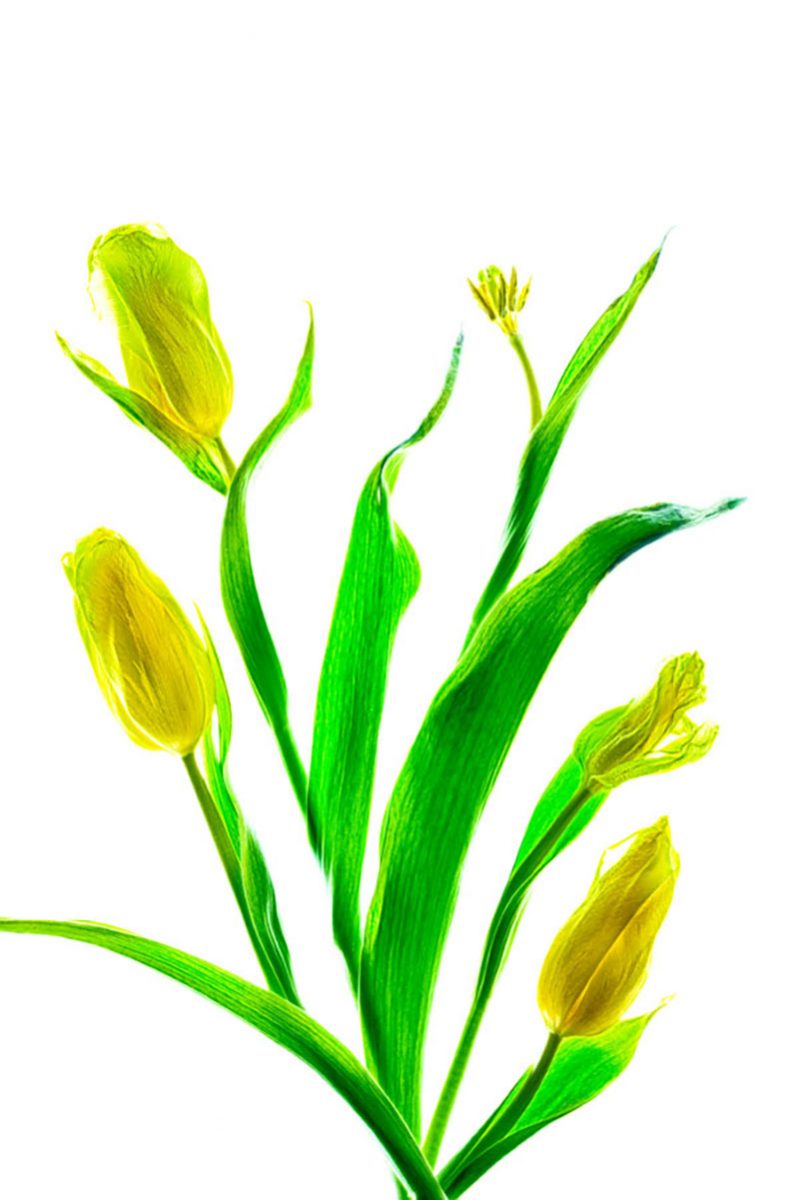
One of the final images resulting from the bracketed series. For this one, I used Nik HDR Efex to process and selected the “Bright” preset before final editing in Photoshop.
Be Willing to Sacrifice. What??? Yes, I said sacrifice. Your beautiful bunches of flowers are on the table looking amazing and waiting for their close-up. They have no idea what’s coming next. That would be your scissors … Here’s the situation. You’ve got this amazing bouquet in whatever form in perfect condition. They are perfection and beauty in every way – color, texture, curves, flow – flawless. That is until you start your lightbox session. In the building of your images, you will find that not all flowers lay flat and some stems simply don’t cooperate. Snip, snip, and now they do. There goes perfection – sacrificed for your vision.
All flowers have curves – some more than others. We embrace and are attracted to those curves. The issue with curves and the lightbox is that making the flowers lay flat or in the direction or orientation that you want them to can be difficult – unless you cut off their heads or snip some leaves and stems. Not only that, your vision may lead you to pull them apart, rip them to pieces, press them with glass, poke holes in them and sprinkle them across the scene. So far, I’ve had the most hesitation to do this to orchids. However, it was necessary and rewarding for the image I wanted. Do what works for you.
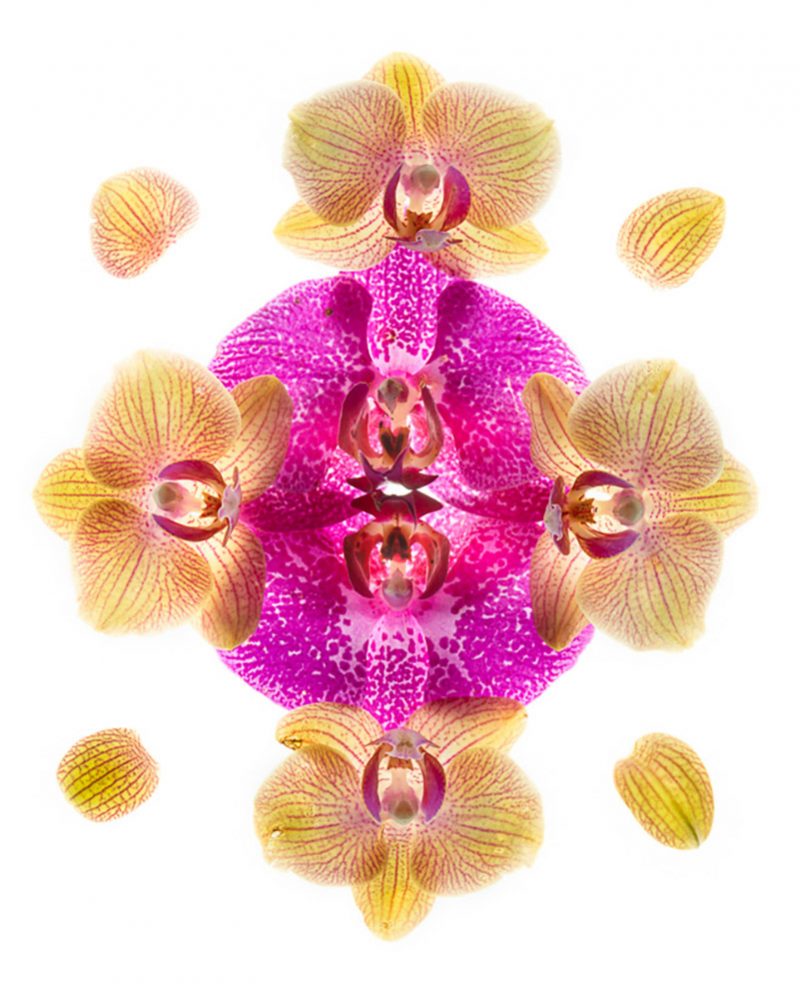
It is very difficult to look at an orchid (or several orchids) and imagine cutting off their heads for a composition. However, it is the only way to be able to create this composition. I’m not sure how often orchids will be on the cutting table, but we shall see . . .
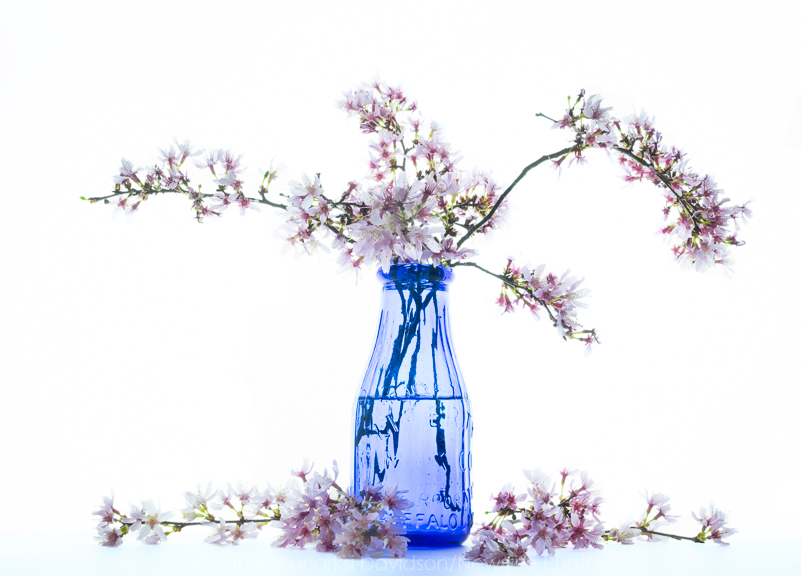
Don’t Forget the Still Life. Much of my early lightbox sessions involved the box being flat on the floor and me shooting downward. That’s not all that you can do with a lightbox and your flowers or other subjects. Think about using the lightbox to create high-key still life images with flowers in bowls or vases or small bottles. To do this, you simply stand the lightbox on its side. Be sure you have it stable and secure. You don’t want to go through all the motions to design a still life and then have the lightbox fall on top of it. In addition, most lightboxes (at least the kind I am using) have a black border surrounding the lighted area. You’ll need to raise your subjects and be mindful of that border to keep it out of the frame. It helps a lot to do a mock-up of your idea so that you choose the height and dimensions that work within that border. Take your time. Think things through. Once you get started, you can add and subtract elements as your composition and imagination direct.

This blue bottle and the spring buds were the foundation for a variety of compositions. The blanket of blooms on the bottom came from being cut or plucked off of other branches. To keep them bunched together, I used a blower bulb instead of my fingers for positioning.
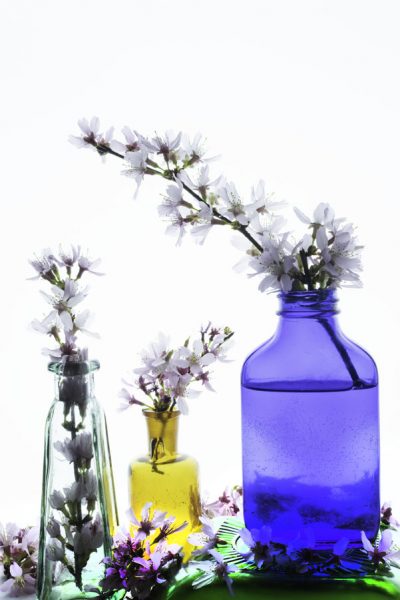
The same blue bottle and spring blooms are joined in this image with two other small bottles. It took some maneuvering to get the right balance. The blue bottle was placed on top of a green glass dish to elevate its position and provide some framing in the composition.
Things to Consider When Shooting on the Lightbox. Remember that what you’re doing in simple terms is photographing a very brightly backlit subject. Your goal is to capture an image that reflects the colors and textures and detail of your subject with a white background (high key). You have to add light to your exposures to bring your subject out of the shadows. You may select a single image in a series that works for you and be quite pleased. With simple compositions and singular subjects, this can work well.
However, in order to capture all the tones and textures of the subjects on or in front of the lightbox, you will likely need to shoot a series of bracketed exposures and process them as an HDR image. When you do this, you typically don’t need any exposures in the “dark” zone since you’re working with a white background. Within the series of images, keep shooting until you have almost no subject detail in the frame. You may not even use that last exposure in post, but you’ll have it in reserve.
Another practical thing to consider include keeping the lightbox clean. When you are layering and stacking and moving flowers, stems and petals, there is often debris that shows up in the frame. Use care and keep a pair of tweezers and a blower bulb handy. You will be glad you did.
Creative Post-Processing of Lightbox Images. There is a multitude of options for how you post-process these images. If you choose a single image, make sure it reflects your subject as you desire. Don’t choose one image and plod on once you realize that you need to perform reconstruction to make it work. Choose the image that works best for exposure and composition. If you decide to do process as an HDR series, make sure you have a good range of exposures to work with. Your end goal is to have an image with white background. HDR software works well, but it doesn’t know exactly what you want. Be prepared to increase exposure in the image to achieve the high-key look. A gray background doesn’t work very well. A more advanced process would involve working in Photoshop and layers and masking to include various portion of each exposure as you desire (manual HDR processing). (Harold Davis does a far better job at describing this process. Visit https://www.digitalfieldguide.com/faqs/using-a-high-key-layer-stack to learn more.)
Don’t Forget about Textures and Other Artistic Approaches. By doing the work in the shooting phase, and following through with the good initial post-processing, you give yourself more opportunities to take advantage of the other techniques. These include adding textures to your images, blending images and creating pieces that evoke the look and feel you want for the subject. There are many choices for this. I have my own collection of images that can work well as textures or for blending. When I’m out shooting, I pay attention to scenes and often photograph for textures. I often use Topaz Studio and the Impression and Texture Effects software for this next step. There are so many possibilities that go beyond the initial frame to create interpretive images that reflect your vision.

Spring buds in a blue bottle with a spray and floor of blooms in high key. This was where the series began.

Interpreting the original image in Topaz Impression to create an different feel for the still life.

Spring buds without the bottle positioned on the lightbox to create a still life in high key.
Here the spring buds still life is transformed into something more using Topaz Studio and Texture Effects.
As I noted at the start of this post, I’m at the beginning of mastering this creative technique and see myself working with many more flowers and other subjects in the future. I am excited and inspired to have even more extensive sessions with the lightbox. Each one so far has lasted no less than two hours. Lightbox photography provides a wonderful opportunity to put a chokehold on “whining” when it’s too cold, snowing or raining or too hot and sweltering outside. It’s a wonderful “Lemonade Maker.” Remember, we’re not in charge of the weather. We get what we get.
And with that, I raise the glass filled to the brim with lemonade for the rainy, snowy, too hot and too cold days and wish you well with your own exploration of this full-of-light tool. Cheers!

Interpretation and different composition from the “yellow tulips” session.

Toward the end of this session, I plucked yellow tulip petals and placed in water with this bloom.

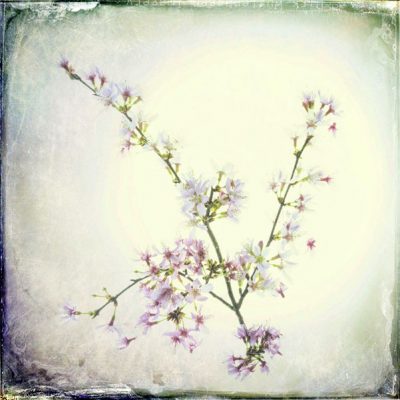
Spring blossoms that were snipped and snipped and spread carefully, rearranged much, to create this piece.

From the “orange roses” session taken a step further with Topaz Studio and Texture Effects.
Those same orange roses from the original image processed in LAB color with inversion.