
Creativity doesn’t wait for that perfect moment. It fashions its own perfect moments out of ordinary ones.
–Bruce Garrabrandt
Interest in infrared photography is on the rise, and with that interest and the options for filters and conversions and post-processing come the questions. First, I’ve taken an infrared picture, now what? There are lots of questions that follow about white balance, channel swaps, using filters or converted cameras, lens choices and hot spots, and a slew of other technical and creative issues to address. That is NOT what this post is about. Instead, I will share some thoughts on the creative process – or rather MY creative process – for interpreting infrared images. Everyone follows their own path, and I’m sharing mine.
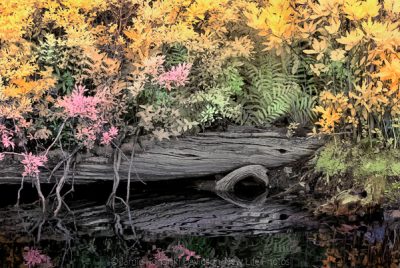
While driving through one of the wildlife refuges in Eastern North Carolina, I photographed this log in the canal surrounded by foliage. This is the faux color version of the image from 590nm conversion. You can be subtle or bold – You choose. This is Step Two in the processing workflow for me (first the raw, then faux color, then black/white).
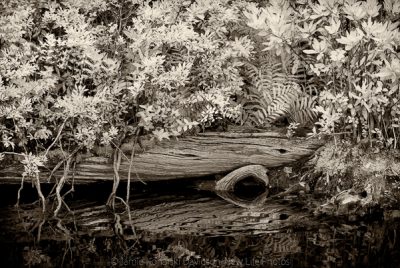
And, here is the black/white version of the image to the left. As mentioned in this post, working the faux color version gives the black/white software of your choosing the most data to work with to give you a good starting point for refining that version. This is Step Three in the processing workflow for me (first the raw, then faux color, then black/white versions).
The Backstory on Me and Infrared.
It was probably in March of 2010 when Mark Hilliard approached me and said that I should be shooting infrared. He said that he would send me a Canon 20D at 590nm to shoot. “Okay”, I thought. “So, I’m a Nikon shooter, and what the heck is a nanometer?” I got the camera with no instructions, no manual – simply, “Just go shoot.” So, I did. Months and many images later, I ask, “Now what???” And, so began my healthy addiction to invisible light and another way to keep shooting when the light is most unfavorable for color photography. I picked up a Nikon D90 and had it converted to 590nm. Why 590? Because I simply LOVE color! And that wavelength invited me to a color party every single time I sat down to edit. A couple of years ago, a friend gifted me his Nikon D800. I had it converted to 850nm, which now gives me coverage in both ends of the spectrum. There may be more conversions down the line, but this combination suits me well for now.
In 2011, Mark and I began leading workshops that focus on infrared immersion. One of the great perks of these workshops is that there are no 4:00am wake-up calls, and we get to share the ordinary and extraordinary places in a new way. Simple scenes and subjects are transformed. Our workshop clients experience infrared and learn in the field and how to post-process images at any wavelength. Note: All of our workshops incorporate and are suitable for color and infrared; and we have loaners available for those without converted cameras or for those curious about other wavelengths. In fact, our Blue Ridge Infrared Workshop is coming up fast in June, based in Blowing Rock, NC. For info on workshops, visit https://www.newlifephotos.com/photo-tours-workshops/ .

Mystic Tree – This was an image (590nm) that showed me what was possible in terms of faux color processing. Being able to create colors at will from an image that does not seem to hold them was magical. Early in my infrared post processing journey, this revealed many windows of opportunity.

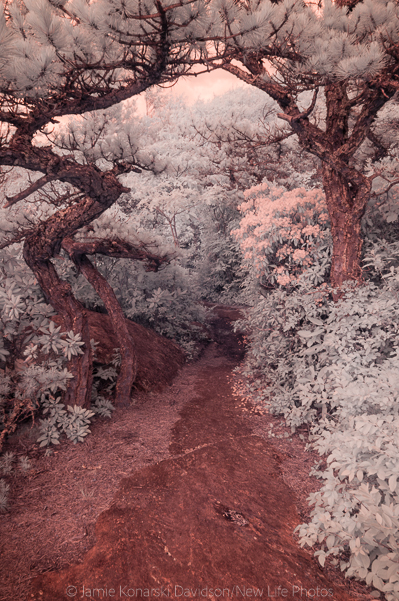
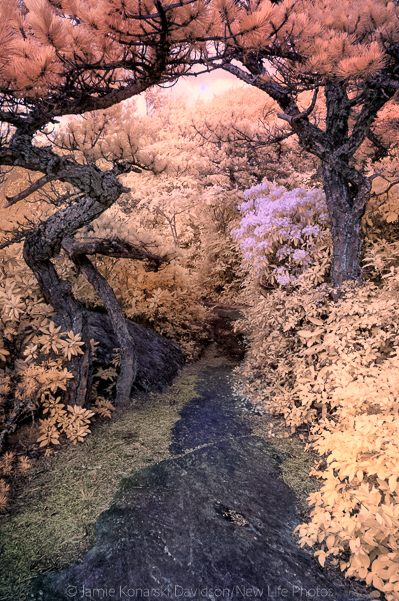
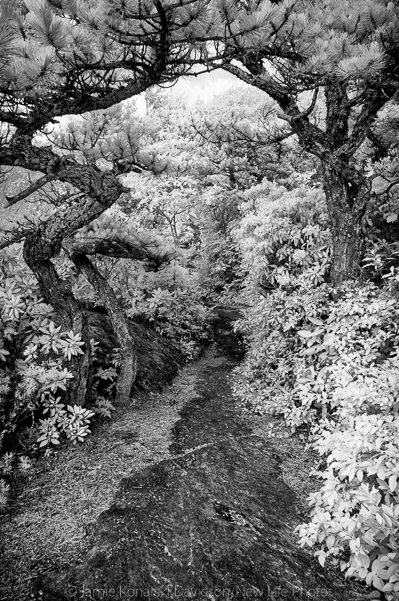
Winding Brick Path (590nm) When I’m shooting in infrared (or color), I’m looking for lines and curves and interesting design. In this image, I chose relatively subtle colors and added a texture to bring the image to where I felt I wanted it to land with Topaz Studio’s Texture Effects.
Back to the Creative Process for Interpreting Invisible Light.
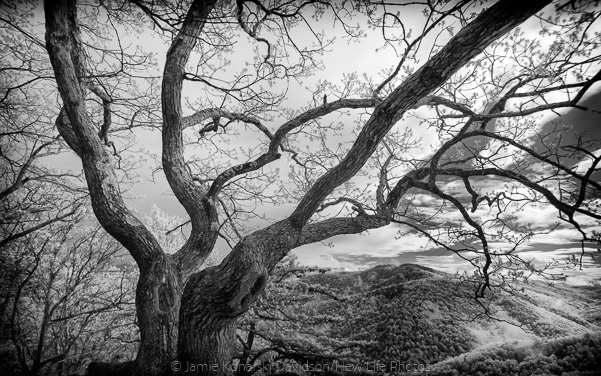
When I go out to shoot infrared images, what am I looking for? In a perfect world, the sky would be blue and filled with puffy, white clouds; the scene filled with green trees and fields, some water feature and a barn or two with a big, rusty tractor for good measure. Good luck with that. The beauty of infrared though is that many, many (did I say many?) subjects beyond the scenario described above work incredibly well. I am open all the time to exploring all options. Trees are among my favorite subjects in all flavors – color, infrared, monochrome. Their “bones” are alluring in every way. Rural landscapes work for me anytime, and so do seascapes and shrimp boats and architecture of any style. Dramatic skies paired with long exposures in infrared are magical and impactful. Graphic elements, leading lines, curves and objects with great texture and varied tones work well also. The only subject that is not for me is people and portraits. They make intriguing images in infrared, but not for me. I choose not to photograph people, not even in color. I remind myself that photography is my soul feeder. And, not one thing I ever shoot complains about how I make it look. I am good with that.
Regardless of where I am, I’m looking for an interesting subject, something that holds my attention and makes me stop. I’m looking for light that works for and with the subject. I have been doing this long enough to know what will translate well and how to work with it in post processing. Sometimes I can see where I might go with an image, sometimes not. The key for me is to be open to the process, to shoot what moves me and not worry about the next step until I get there. Being present and intentional is valuable.
I get my exposures and compositions “right” in the field to the best of my ability based on the situations. For example, when shooting at 590nm, I am careful to watch the red channel in my histogram and not blow it out. This helps to retain all the color information I might use in the faux color process. I’m also mindful of how I arrange the elements in the frame. I do not and will not adopt the “I’ll fix it in Photoshop” approach when the opportunity is possible to do the fixing in the field. Is every image meticulously arranged and perfectly exposed? No, not always. However, I do strive to end up with the best possible frames to match my vision. I don’t want to get out my boots to wade through the slop of mindless, lazy, hit-and-miss shooting.

Stretching Time in the Blue Ridge (850nm) Long exposures add impact to your images in infrared. Be on the lookout for an awesome scene and moving clouds. Most often, I’m using a 10-stop ND filter (Breakthrough Photography ND filters are excellent quality and true to their filtration indicators.)
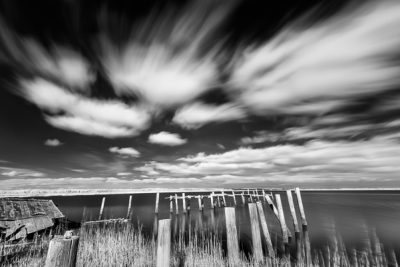
From the mountains to the sea, be on the lookout for worthy subjects and opportunities to combine them with long exposures. Here is a broken fish house in Saxis, Virginia, that speaks to Wabi Sabi magic at 850nm with 10-stop ND and a few slowly moving clouds.
The Other Party in Post.
The beauty and challenge of post processing our infrared images (or any image, for that matter) is that we have choices – lots and lots and lots of choices. And we have voices — the voices of uncertainty, of the critics and the voices of encouragement. I prefer to listen to the last one. What is the correct choice for processing and interpreting our images? It depends. As with any image, we must evaluate where we want to go with them and what choices work best for achieving an image that mirrors our unique vision. There are definitely benefits for starting with a workflow – some clearly defined and orderly steps – to get you going. For me, consistency and developing creative muscle memory open doors and windows to deviating and experimenting successfully. The “Willy Nilly” approach (who is he, anyway?) has never been helpful for me. I don’t want to get “lucky” once and not know where to find lucky again.

Horton House on Jekyll Island, Georgia. Layered openings frame the mighty Live Oak at 850nm. This image interpreted for a different tonality to match my vision. All post processing choices are personal & subjective. Start with a well thought out composition and go where you want to go.
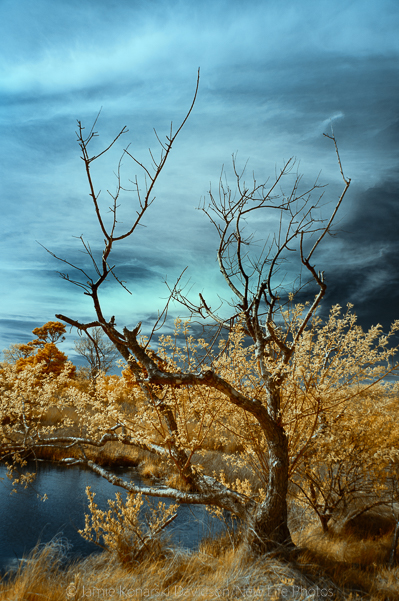
Assateague at 590nm. This tree was waiting for its close-up at the end of a boardwalk loop in gloomy skies. Processed using dng file and channel swap from CLiR. A custom white balance is essential. (Adobe doesn’t like them.) The dng file is for my Nikon D90 at 590nm. It works wonders!
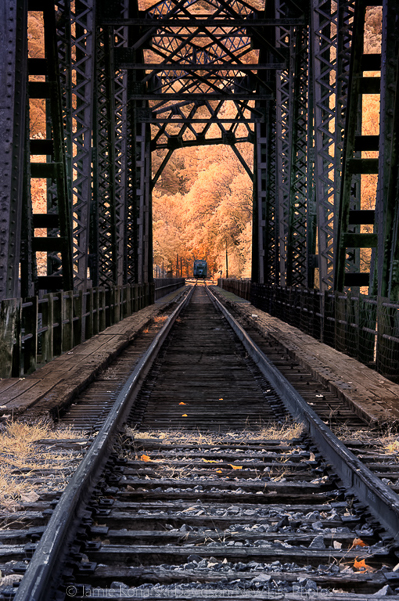
Thurmond, West Virginia, Railway at 590nm. Just one of my favorite areas to photograph, this image incorporates graphic lines and a bold interpretation in faux color during one of my “Color Party” sessions. For those who love color, my recommendation would be: Don’t hold back…
Selecting and Working the Image.
When I select an image to post process, the path I follow is pretty consistent regardless of whether it is infrared or color. (Note: I shoot in Raw all the time. It works for me and provides maximum control in post.) I’m looking for the best possible starting point – an image that speaks to me and to what made me stop. Sometimes the image is about drama, sometimes it’s about the quietness. Other times it’s a matter of curiosity; and sometimes it’s just because I love the subjects. My image, my vision, my choices. Same for you. There are no rules that state others have to agree with your choices. They don’t even have to like your images. That’s for you first.
In beginning with the raw image, I process in Adobe Camera Raw, making adjustments for white balance, contrast, exposure and lens correction. If I feel the image is worthy of further work in its raw state, I will further interpret and refine in Photoshop. Generally, I will name and save each version of the 590nm images for what I refer to as “the triplets” (raw edited, faux color and black/white). When working with the 850nm image files, I will name and save just “the twins” (there is no color version).
Blue Ridge Trail Reward (590nm Raw Edit) When rounding a bend that opened up to an amazing vista, this “doorway” led to the way back. What a treat for me! Step One – Edited Raw (optional, but part of my workflow).
Blue Ridge “doorway” in faux color stage (590nm). This is one of my more subtle interpretations. If I were to re-edit this, I might make different choices, but it depends on my state of mind when I work the image. It’s never the same.
Blue Ridge “doorway” in black/white stage (590nm). This is actually my favorite of the three versions, but with wavelengths that allow visible light to share infrared light, my workflow always includes the faux before monochrome.
Faux Color Party at 590nm
In the faux color processing phase, I’m looking at the image after the red/blue channel swap to see what direction I want to move in terms of selective colors, lightening and darkening areas, adding structure and contrast. As I mentioned earlier, I love color. So, this is where the fun begins for me. Remember, it’s my party, and I’ll color how I want to. In these moments I am going with the flow (a general series of steps), but I’m also open and subject to the veer. My faux color images are very rarely subtle or pastel in nature. My style is more of an “in your face” flavor more often than the gentle touch. It works for me. Does that mean that I always go for the bold interpretation? No, but my faux color history might indicate otherwise. I save my softer side for when I’m photographing my flowers. Then, my style is a balance of bold and soft colors as well as selective focus and shallower depth of field. The soft side is rare in my infrared work.
Either way, where my images end up is true to me and how I interpret the world around me. You, too, should be true to yourself and work toward your images being a reflection of you. Recognize, also, that our styles evolve and change over time as we learn more, are inspired by others and their work, and as we remain open to exploration and experimentation. The words, “what if” and “I wonder” can do wonders in a creative environment if you use them to free you from the “shoulds.”

Go for the Gold! There’s a reason they call the 590nm “Goldie.” Here’s what can happen when you go for it!
Here’s where the image started after custom dng profile and SWAP4 from CLiR software.
Here’s where the image went after the channel swap and faux color. Last stop? Monochrome.
In the Monochromatic World of 850nm
While it is likely clear that I have a serious color party at 590nm, I am also reminded of a time when my love of color prevented me from “seeing” in black and white (or monochrome). It was only when I began shooting in infrared, where the color was “stripped” and changed into tones and bones that I was finally able to envision a color scene without the color. My 590nm files reminded me of negatives. This gave me encouragement and confidence to leap into another wavelength. Hence the conversion at 850nm.
With these image files, I still choose to interpret the subject to match what I see and feel. In the 590nm range I always (yes, always) process for faux color before converting to black/white. In so doing, I’m giving the software the most data to work with to generate the strongest monochrome version possible. With the 850nm images, I’m basically doing the preliminary work in ACR (Adobe Camera Raw) to achieve a good look and starting point for whatever black/white program I choose to use. Typically, I find that these images are lower contrast, and I’m consistently adding or adjusting this in every image. The point about doing the best work in the field – particularly for color (not faux) and monochrome – is that the process in post is more about refining rather than performing reconstructive surgery before moving into the creative zone. Who wants to go through surgery? Not me.
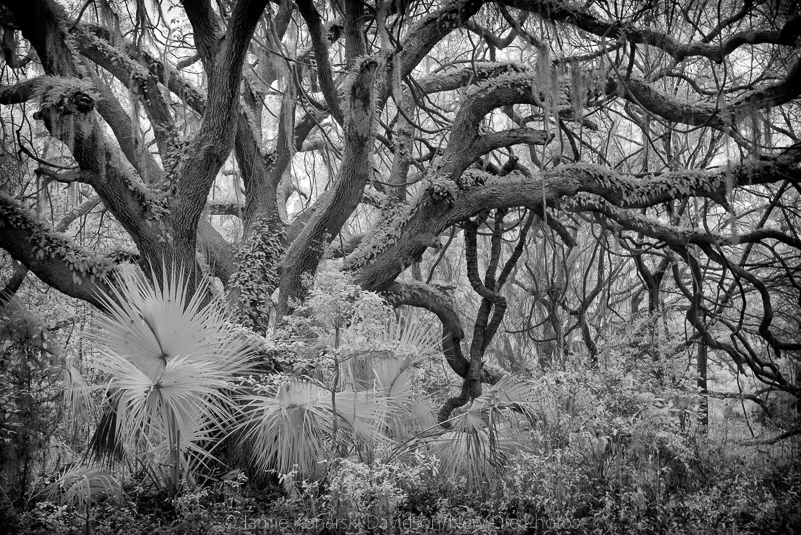
Bones of Live Oaks in Georgia coupled with palm and other foliage at 850nm. Magic.
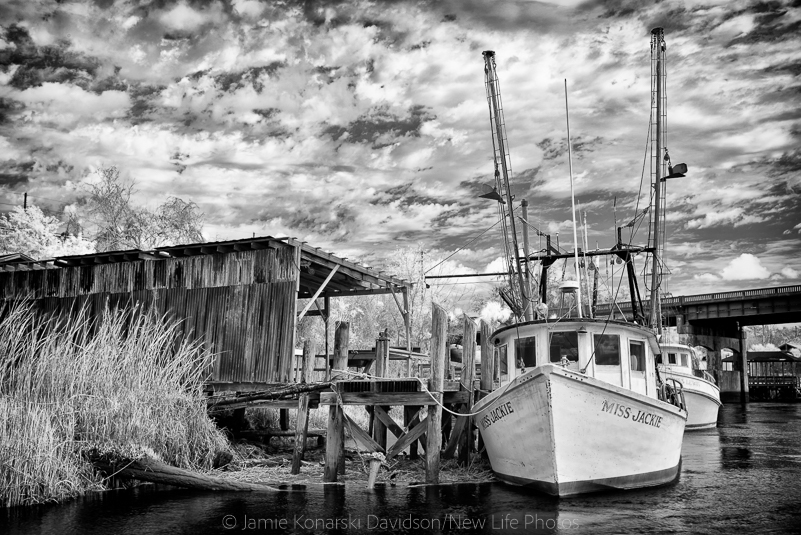
When you have clouds and water and shrimpers, it all comes together in infrared (850nm).
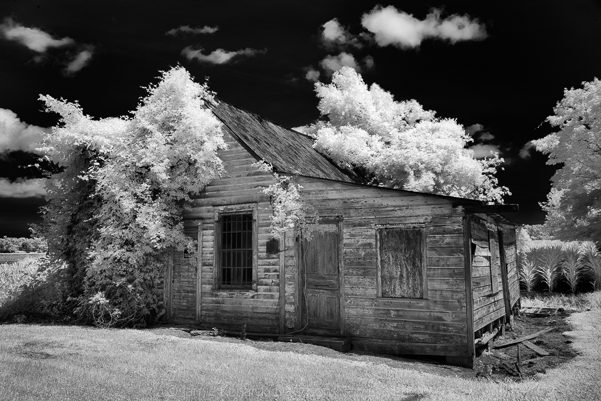
The Old Made New in infrared … 850nm works its magic in a scene that color rejects.
Embracing and interpreting the invisible light of infrared is, quite honestly, addictive. If you love photographing at all hours of the day and want an alternative when the light for color is “bad,” infrared is your answer. Step boldly into this magical light. You won’t regret it (at least, I haven’t).
Finally, within the captions of the images included in this post, I share more individualized thoughts on the images and where I went with them (and sometimes why). Remember, we all view the world through different sets of glasses full of life experience, perspectives and knowledge.
The more we experience and learn, the more our vision changes. Note, I said “changes”. I did not say it gets better or worse, even if our eyes say otherwise and glasses are added to the mix. If ten of us began with the same identical image to work for color, infrared or black/white processing, we would end up with a minimum of ten uniquely different interpretations. And, there is the beauty of creativity and freedom of art in any form.
Embrace your vision. Go “Do You!”
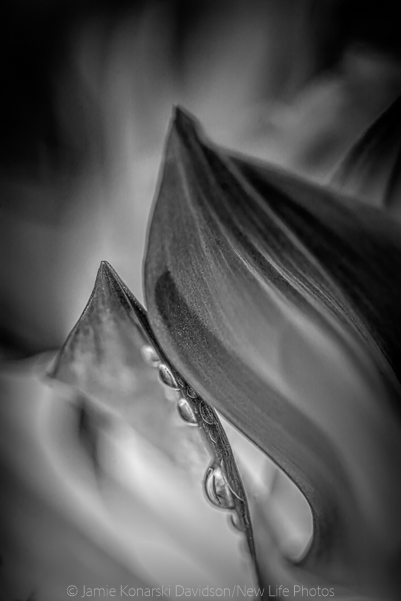
Even the petals of a dahlia have something to offer in infrared (850nm).

Blowing winds in the Blue Ridge offer up treasures (850nm)

In the bitter ice of winter, “Relentless” holds her ground in Chincoteague Island (850nm).
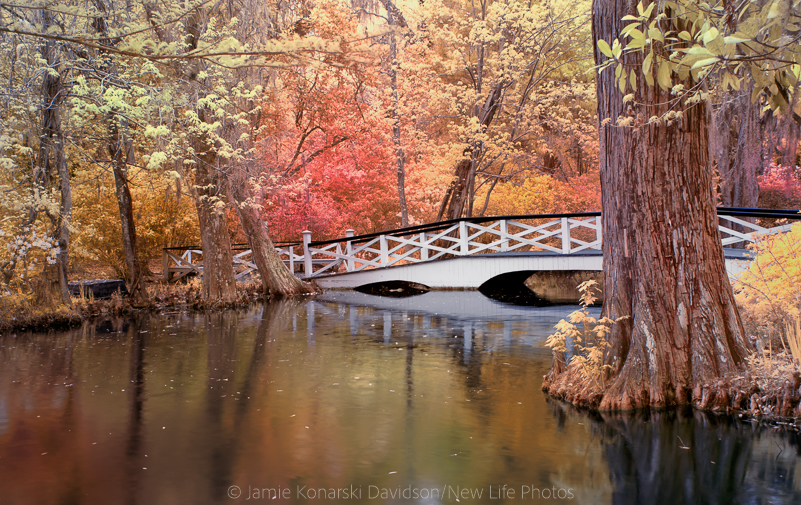
The white bridge at Magnolia Plantation done differently at 590nm and faux color processing.
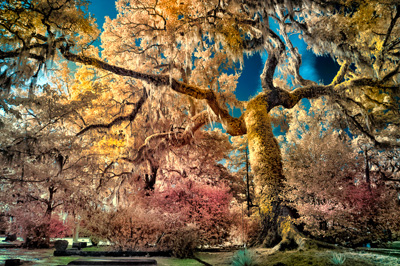
Magnificent Oak in Pawleys Island cemetery in faux color at 590nm.
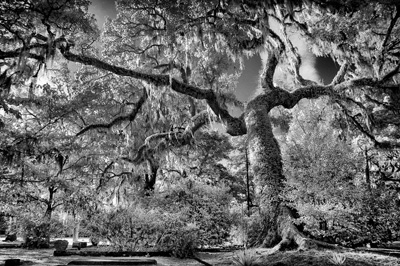
Magnificent Oak in Pawleys Island cemetery in monochrome at 590nm.
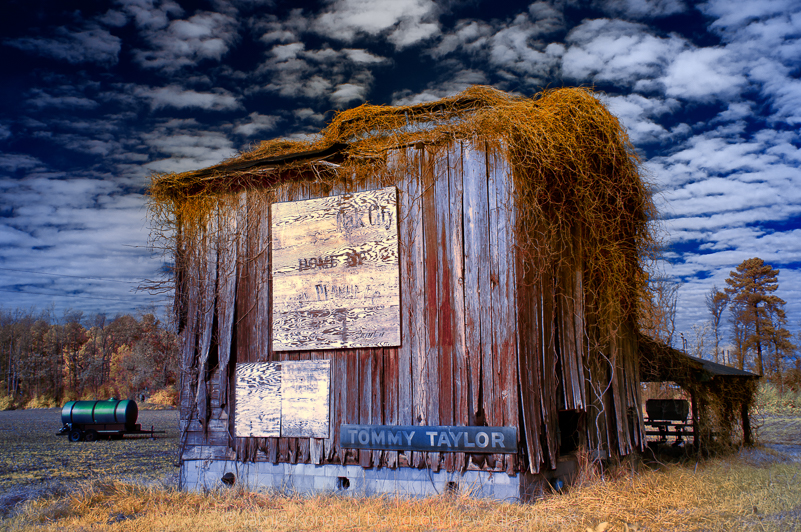
Oak City Barn that will soon be gone in Eastern North Carolina. These gems are disappearing, and infrared at 590nm is what made this image possible. Surprisingly, it has meant a lot to the family connected to it.


